Tuesday 23 December 2014

DIY Christmas baubles / decorations

Every year at the run up to christmas I promise myself that this will be the year when I make at least some of the umpteen ornaments and decorations that I have piling up on my 'Pinterest' list and every year I seem to end up saying "I'll start earlier next year". Of course I never do 'start earlier' because making christmas decorations doesn't seem a priority in the months when the weather is fine and I can be gardening or in the workshop making garden structures.
This year was no exception, not so much due to productivity on the garden front but more to do with illness and/or loss of mojo. So now, feeling rested and relaxed after a much needed vacation to Mexico I'm finding myself frantically trying to make new ornaments and baubles with just 2 days left to the big day itself knowing that once christmas day has passed I'll once again return to thinking "I'll start earlier next year".
The problem with this frantic need to create a masterpiece is that I'm cutting corners and trying to get a professional look in a quarter of the time using materials that really aren't going to cut the mustard so I've decided enough is enough - I really will simply have to 'start earlier next year'.

Before I went away I did manage to complete a set of 6 personalised baubles for the tree using my new favourite crafty product - vinyl.
I cannot believe I wasn't aware of vinyl and its crafty gorgeousness before now but I really didn't, not until I came across it on 'Pinterest' and once I saw what it could do I knew I had to try a small project using vinyl and my Cricut. It's safe to say I am now so in love with vinyl projects that I'm saving up for a Silhouette Cameo to unleash a whole new load of ideas and projects.

The baubles turned out pretty good for my very first vinyl attempt and they look great on the tree. There are various tutorials all over the internet and 'Youtube' so I won't bore anyone with the precise steps that I followed to create these


For the most part they were relatively easy and I was only restricted by the few fonts I had on Cricut cartridges (another reason to get a Silhouette cameo).
The hardest letters no matter which font I used were the 'O' and the 'W', it doesn't matter what method I used to put those letters on they all resulted in at least one crease and in the end I had to accept that no one was going to scrutinise them closely enough to notice.
The ribbon was fiddly more than difficult but I suspect it was more the hack handed way I was going about doing it than it being a difficult job. I have a tendency to choose the quick route over the correct route too many times even though I know it's going to end in frustration and a less than perfect finished look - this is something I seriously need to work on.

Another  project completed and showing the 'quick route' result is these xmas baubles


Don't laugh! I told you the result from the 'quick route' is always less than perfect.
What you see here is my attempt at a bauble xmas tree only I couldn't be bothered with sorting the baubles first, working out a configuration that worked or even to fix the trigger on my glue gun first!
With a broken glue gun trigger I literally had to somehow hold the gun in a position that meant I could hold it and push the glue stick through in one hand while holding the baubles together in the other hand - I do not recommend this method! This resulted in burnt fingers and glue going everywhere because I could not control the gun holding it in that manner, hence why you see alot of solid glue in the finished project. This angle is the better angle, the other side is atrocious.
I would happily have thrown the whole thing away but for some bizarre reason my husband likes it - hmmmmm maybe it's a sympathy thing, maybe he felt bad for me.
Needless to say I am replacing the glue gun!

Another project that should have been easy but tested my patience was the very simple baubles in a giant teacup


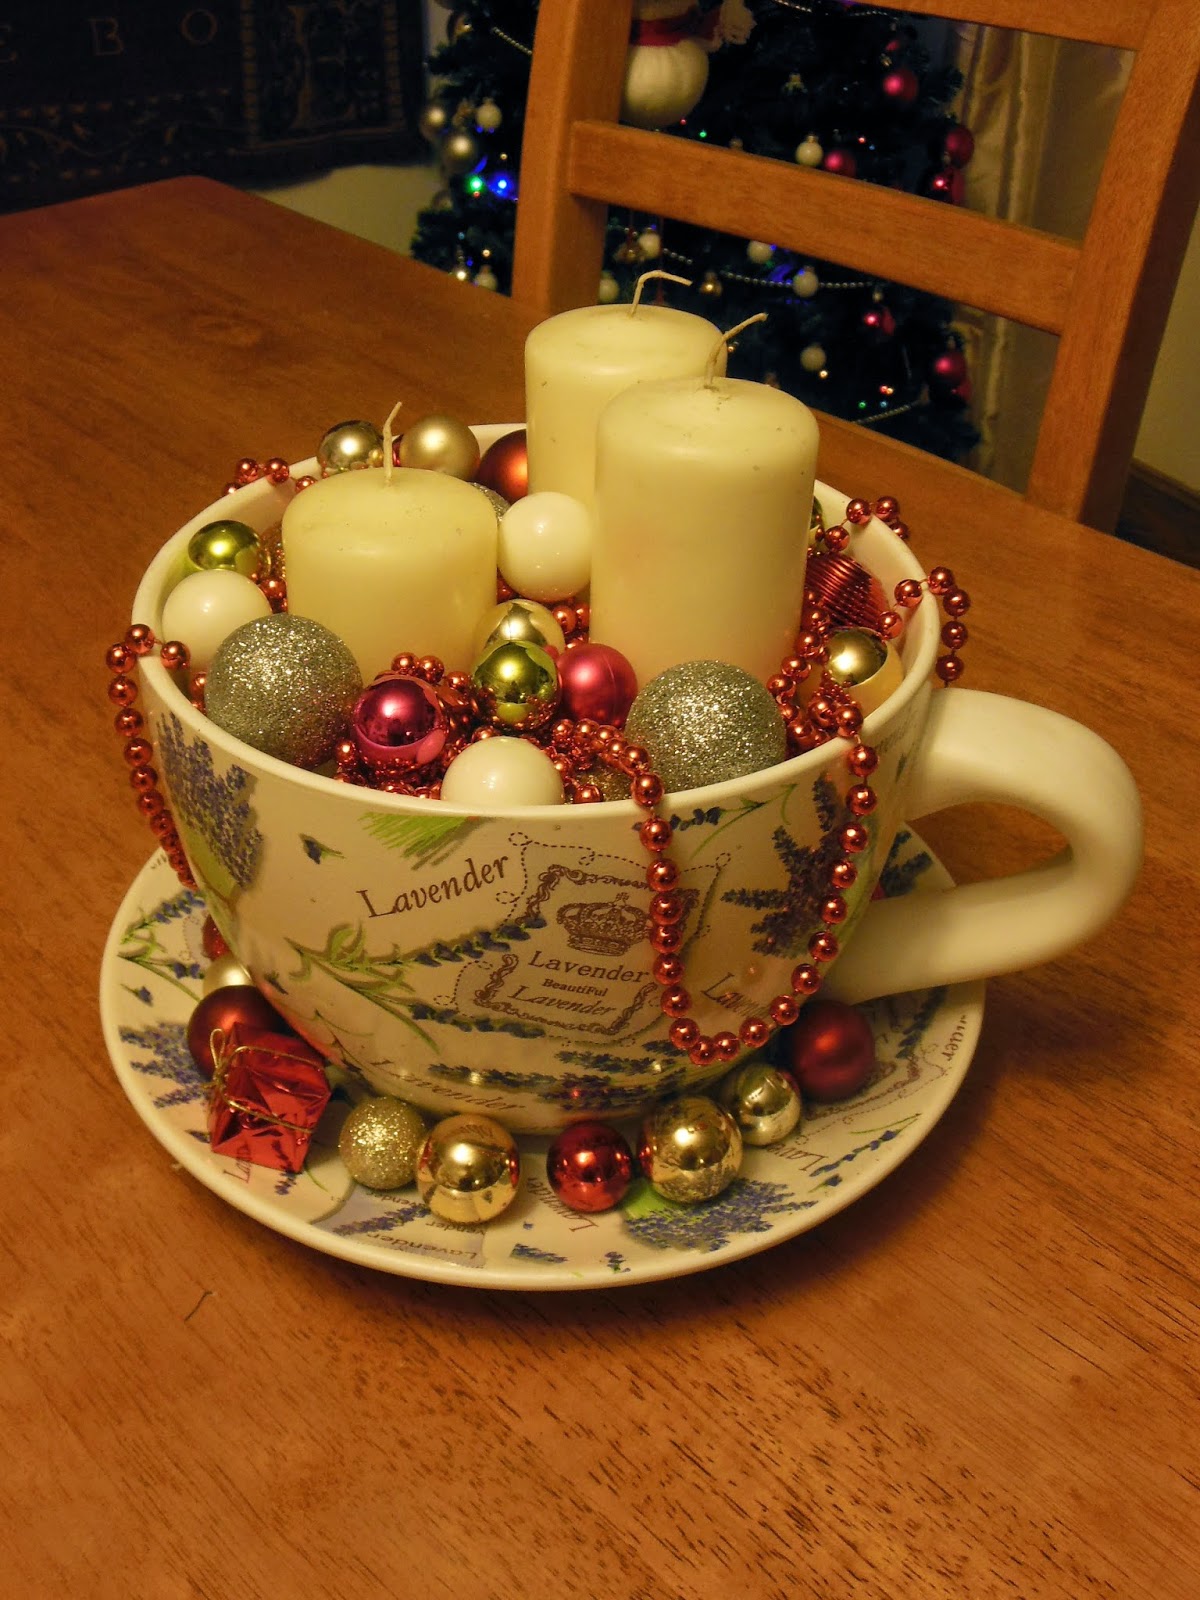
These things just never turn out the way I imagined even when I don't take the quick route.  I'm not entirely sure what I expected or why I don't particularly like it (maybe it needs to be a xmas teacup) but it's staying for now and then I'll rethink it next year.

This could be my last post before Christmas day so in the words of Clement Moore "Happy christmas to all, and to all a good night"

Shared at:
ART IS BEAUTY 
The chicken chick 
Sewcando 
FromGardners2Bergers 
Gingersnapcrafts

Friday 19 December 2014

Sleigh bells ring - DIY sleigh bells

Has it really been 4 months since my last post! Wow, that just goes to show the serious lack of creative impulses this year due to being ill so much. However, xmas is one time of year guarateed to get the imagination turning on all cogs and I've managed to get round to making a few decorations for the home - todays post is showing one that I've wanted to make for the last couple of years but have never seemed to get round to it - Sleigh bells!

There's loads of inspiration for these on Pinterest and so lacking is my imagination right now that I admit I had to pinch a few of the ideas but I'm totally thrilled with the finished piece.


My problem - well one of them - when working on a project is that I very rarely have a finished look in my head, the entire description I had down for this project was simply 'Sleigh bells', no ideas for what that actually meant and to be honest I made it up as I went along basing it on various Pinterest / Google images that I liked the look of.

Here's how I made it and the only item I had to buy was the belt because I didn't have an old, spare one.

I bought the belt from New look for a fiver and while that's more than I wanted to pay it had a nice pattern to it that I thought would work well so I begrudgingly put my hand in my pocket.
I had intended to batter the belt with a hammer to age it but I forgot!
I cut the belt into 2 lengths, one longer than the other and cut the pointed ends with scissors.
To attach the Sleigh bells (which I purchased yeeeeears ago ) I used a hole punch to punch 2 tiny holes behind each bell


then thread some craft wire through the sleigh bell hook into the holes and twisted the wire round the back of the belt to secure


I then cut pieces of black duck tape to cover over the wires attaching each of the sleigh bells but to be honest I think I should have attached one long piece of fabric down the entire length of the back and glued it with Fixall glue instead of each individual sleigh bell wire. Actually I think I will rectify this before it's stored away at the end of xmas


The rest was pretty easy to make up as I went along. The 2 belt pieces were joined together at a slight angle by punching a hole and threading wire through - though hot glue would probably work just as well.
I made the greenery form pieces of left over xmas decorations and wired that to the belt buckle using craft wire ( a decent gauge wire though that can withstand twisting without breaking) and the whole thing was attached to the wooden plaque with wire also - again hot glue would probably suffice.
The wooden plaque is simply a small wooden board from a new set of kitchen boards I've had stashed for years (I just knew there'd be a use for them somewhere) which I painted red with my daughters acrylic paints (Sssssshhhh), sanded down when it was dry and attached vinyl lettering cut with my Cricut machine (vinyl is my new fad and I can't wait to own a Silhouette Cameo).
I gave the whole board a quick spray with varnish and then attached the sleigh bells to it by threading wire through holes at the bottom of the board.

Voila! A perfectly cheap christmas decoration that with correct packaging will last for years.


Sharing with

Link party palooza
Craftaholics Anonymous
Thrifty decor chick
The Creativity Exchange 
ART IS BEAUTY 
The chicken chick 
Sewcando 
FromGardners2Bergers 
Gingersnapcrafts 

Friday 15 August 2014

Workshop plans

I'm currently without a work shop or any kind of working space which is why I haven't been able to blog about completed projects - insert sad face here.
Mr CH is going to be starting on my new workshop any time now and it's going to be amazing - insert happy, happy face here.
The best bit right now is planning how it is going to look, what colour I'm painting it and of course what organisation I can come up with for all my tools - exciting!
We're pretty much dictated to by the area of land we're building it on for its shape but the rest is all down to me. I had thought of doing some kind of Red on the outside as I really like this shed I've pinned on Pinterest


However I think I may regret it afterwards so I looked into the 'Cuprinol' garden paints colour chart and although I don't like painting anything Green I think I may be doing it in Seagrass

Daniel corner log cabin
Of course it's going to need its own sign and I love this Potting shed sign so will probably do something similar but change the wording


The really exciting stuff though will be on the inside. I'm currently pinning every picture on storage that I can but there are some really cool ideas that I know I'm definitely going to have to include:
Isn't this just a brilliant idea! I love how it uses ceiling spacefor storage - though if my ceilings aren't high enough for such deep boxes I will have to adapt it.


 This would be brilliant underneath a main work bench - my work bench gets crowded with every size nail and screw as I rummage through looking for the right size and I'm a lazy worker so things never get put away until the projects finished - this will keep my workspace clear.


All my Router bits are in their own lovely wooden cases but they have to be opened to see what each one is so this will make choosing much much easier and I'll attach the picture of each bit to the front of each shelf too.


My drill has been knocked over more times than I care to remember so this will put a stop to that and will also keep those tiny adapters all in the same place too.


This is a must for my workshop. I have some very heavy clamps and too many times I have knocked them and had them hit a shin or land on my feet.


So there we have it, my reason for not posting much at the moment and the plans that are afoot to rectify it. Until I can build again I will continue to post with other projects that are on the go - usually indoor ones and/or garden ones that can be built outside.

Tuesday 3 June 2014

Diy pallet wood decking

Pallet wood decking is hardly an original idea nowadays is it, there seem to be many people jumped on that band wagon and the internet is full of different designs and ideas.
I have to admit Mr CH was hardly thrilled at the prospect of a pallet wood deck when I first stated that I would be making one but he humoured me none the less and helped me lay the finished boards once I had levelled and squared up the pallet base.

It didn't look much to behold at this point and I actually did consider giving up


But with a little bit ofpatience and loads of nails we were able to create this with more pallet wood and pallets to act as steps to the french doors


I know alot of peoplewould prefer proper decking and maybe some fancy fandangled rails around it but the cost of this decking was the price of a tub or two of Ronseals decking stain - that makes me very happy.
As for the rails - watch this space.
Incidentally those Purple Adirondack style chairs were pretty easy to make too and guess what - yup, all from pallet wood also.


Linked to:

Show me what you got 
Kammys Korner 
I Gotta Create

Saturday 22 February 2014

Candle making from Yankee Candle leftovers!

How many of you, like me, have a tub full of leftover wax from candles that you've burned?
I love Yankee Candles and burn them all the time but I can't bring myself to throw out the last bits left in the jar once the wick has burned through or when I change the scent in the sample burner. I always keep those little bits and I finally got around to making my first candle with the leftovers.
I used an old Yankee candle jar and some wicks I'd bought. I have no knowledge of doing this and I have heard that wax has a flash point whereby it could get messy. I have no idea what that flash point is though so I just got on with remelting the waxes colour by colour.

Here's my little stash
 candle making, yankee candle, diy candle


The melting process was pretty easy, I just boiled some water in a saucepan and then kept it simmering while I dropped a glass bowl in and put the candle wax into the bowl until it had melted through.
Once the wax melted I poured it into the Yankee candle jar and then shoved it in the freezer to set while the next lot of wax was melting in the bowl. The hardest part was keeping the wick upright and centred but once I filled the jar halfway it got much easier.
The finished candle may not look amazing and I assume the fragrance is going to be weak but I kind of enjoyed doing it and may even have a go at making more

 yankee candle, diy candle, candlemaking


Wednesday 12 February 2014

DIY fireplace mantle

I'm not feeling the crafty love right now - it's just too cold to do anything and all I'm inclined to do right now is sit in the warm front room and browse the tinterweb.

Thought I'd do a post on the fireplace mantle I made for the dining room log burner opening. As usual I used all scrap / salvaged wood and as usual I made it all up as I went along and yes, as usual it went very wrong initially.

The whole piece was made from 8"x2"  and 6" x 2" timber and I made it in a few sections for ease and put it all together in situ.
The mantle is a length of 8x2, well sanded and then stained and given a few coats of satin varnish. The upstands at each end are 6x2 timber given the same treatment as the mantle.
The finials that attach the upstands to the mantle were free drawn onto 6x2 timber. I cut four of them out using a jigsaw (with a dodgy blade I might add) and then I glued and clamped them together in pairs to get the chunky look I wanted.
Initially I was looking for a way to put them all together in situ but Mr CH decided (while I was away) that he would attach the upstands to the wall using 'sticks like s**t' - what a stupid idea! The finials had already been attached to the upstands via screws at the back so all that was left was to attach the mantle which Mr CH yet again decided would be fine using 'sticks like s**t'.
The whole thing looked smashing....................for a week or so! Then the wood started to warp from the heat of the log burner and as the only thing holding it together was hubbys stupid 'sticks like s**t' there was nothing to control the warp and the whole mantle started to seperate.
Eventually I decided I couldn't leave it that way so removed the mantle (surprisingly easily - go figure) and replaced with a new length of timber. This time I first screwed a thinner length of timber into the finials and then sat the new mantle on top of it, this meant I could screw the thin base into the mantle from underneath and voila, no more warping.

Here's the finished look. You can se the thinner length of wood just underneath the mantle - should have thought of that in the first place.


 This one shows the finials. I made four in the shape I wanted and then glued and clamped them together in pairs. You can just see the glue seam in this one as I obviously didn't do a very good job of cleaning the glue off and glue doesn't stain.


Monday 27 January 2014

Building with pallets and reclaimed wood.

I'm kind of in love with the 'Ana White' web site, so many free plans there's bound to be something for everyone and I love that they're so adaptable, it's my go to website for inspiration.
This Rustic console table from Pottery Barn caught my eye, as it did for many others so I had to have a go at building it myself with my reclaimed pallet wood

Pottery Barn Rustic Console table.


The plans I followed are here

While my interpretation may not be quite as catalogue ready as something from Pottery Barn I'm still quite thrilled with how it turned out, especially considering the pallet wood I used needed a heap of planing and sanding to make it useable.
The perfect place for my 'Charlie Bear' Wosley to sit. The pallet wood 'Welcome' sign, scrap wood 'Home' blocks and the scrap wood lamp were all past projects of mine - click on the links to go to them.

alt="pallet wood, DIY furniture, Wood console table, DIY"
Rustic console table using scrap pallet wood

alt=" DIY console table, Pallet wood, Wood furniture, DIY table"
Pallet wood sideboard


alt="Wood table, DIY, Pallet wood, Scrap wood, Woodworking, Sideboard"
Pallet wood furniture


Sharing at

Under the table and dreaming
The dedicated house 
Savvy southern style

Friday 3 January 2014

Pallet wood sign

I came across this 'Welcome' sign late last year while browsing the tinterweb for inspiration and finally managed to get my own pallet wood version finished just before xmas.

This is my inspiration found on 'Three Mango Seeds' blog


Here's my version of it


It was pretty easy to do, the hardest part getting my 45 degree corners to actually be true, in fact despite my every effort I couldn't then true and so I had to put the brass corners on to help hide the obvious gaps.
I ended up having to do the writing completely free hand because the lettering I had printed out was either way too small or way too big and I was too lazy to trudge all the way back to the house to reprint them.
All of the wood used for this project is pallet wood from the stacks of them we dismantled last year.


Shared at:
Tillys Nest 
Handy Man, Crafty Woman 
Under the table and dreaming